
PHOTOGRAPHING YOUR WORK
Why this matters so much.
If you want to rank high in a juror’s eyes and get full credit for your hard work, you need quality photographs of your work.
A good photo does what a good frame does in a physical show: it signals that the art has value. That impression matters to collectors and jurors alike.
Below you’ll find tips on what to do and what to avoid, tools for resizing digital images, and additional resources to help you get it right.
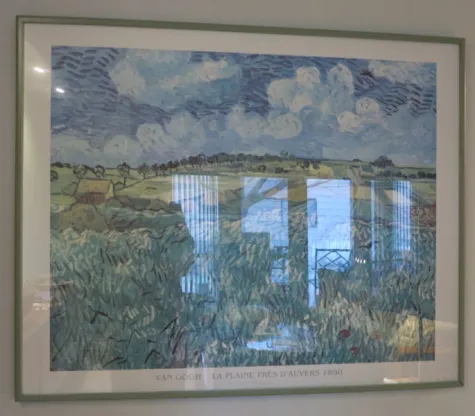
What is a bad photo?
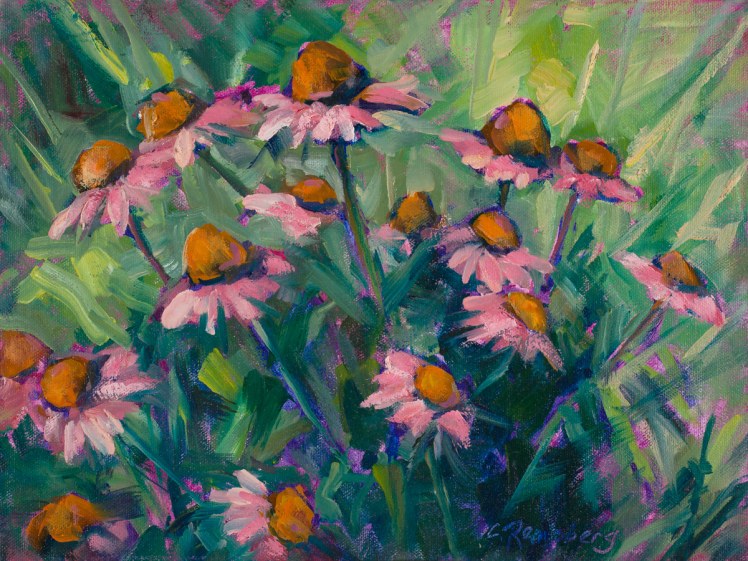
The photos below undermine the artwork. The focus is soft, the angle isn’t square, and glare obscures the surface. The frames are included, which reads as unprofessional. Submissions like these are unlikely to make a positive impression on a juror or curator. (Artwork by Claire Remsberg & Vincent Van Gogh)

Tips and Pitfalls
DO have the art in focus. What looks OK on your cell phone may not look so good when enlarged onto a monitor or projection screen.
DO remove background clutter and crop to the artwork edges.
DO use good lighting. Bright but diffuse natural light is one option. A colored room will throw off the colors of your work, as will a deep blue sky or dim lighting.
DO use neutral uncluttered backdrop for 3D pieces.
DO size the digital file and title the file according to the application instructions.
DON’T include the frame or mat unless it is a critical part of your creative work. In most cases, the frame is interchangeable and not critical to the art. Also, a frame can add undesirable shadows on your photo image. Furthermore, if someone loves your work, but does not care for the frame, you are not doing your art any service. It is best to get a good photograph BEFORE you add the frame.
DON’T shoot through glass, which almost always results in distracting glare. Get in the habit of photographing your work before it gets sealed behind glass.
DON’T use a photo that has glare. How to avoid this is more than can be explained here, but experiment until you get it right. Diffuse lighting helps.
DON’T shoot a 2D image crooked, skewed or other than direct and square from the front.
DON’T include yourself in a photo with your piece for formal submissions.
DON’T be afraid to hire a professional for your best pieces, or ask a skilled friend for help, if you can’t master this yourself.
For local professionals, go to our “Local Resources” Page and scroll down to Professional Art Photography.
Resizing Digital Images
Many artist opportunities require specific image file sizes and DPI resolution (dots-per-inch). There are different software applications you can use to get this done.
TIP! Do not adjust your original, full size photo. Instead, duplicate it and then resize the copy you made.
If you’re a Mac User: You already have Preview loaded on your computer, which can resize your photos using the “Adjust Size” tool.
If you’re Windows User, here are some online services & apps:
https://picresize.com/
https://www.pizap.com/photo_editor
https://www.fotor.com/
https://pixlr.com/
https://www.gimp.org/
https://www.canva.com
Additional Resources
Terry Howell Stanley’s article on “How to Take Good Images of Your Artwork”, good advice, plus examples of bad photos
Gurney Journey is a blog by James Gurney for illustrators, plein-air painters, art students, and others
Tom Schmidt’s presentation to Oil Painters of America
Will Kemp’s article on Photographing your Artwork with an iPhone
ArtsyShark article “Avoid these 7 Mistakes when Photographing Art”
Artwork Archive “4 Steps to Photographing Your Art Like a Professional”
National Portrait Gallery (UK) “How to Photograph Your Work,” which is specific to their competitions, but has some good advice nonetheless.
Volunteer Opportunity!
This painting by TVAA artist Claire Remsberg is focused, glare-free, frame-free, and shot square — exactly what a strong submission looks like.
If you can consistently produce photos like this, consider sharing that skill with fellow members. We’re always looking for volunteers to coach others or step in to photograph their work directly.
Interested? Let us know.